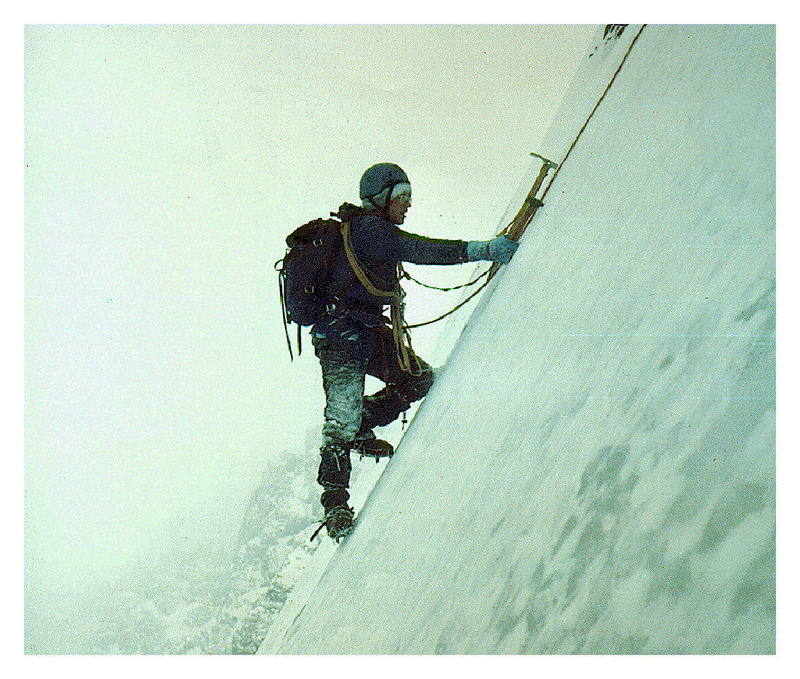
Bob Boyles, Mike Weber, Art Troutner and Frank Florence made the first Winter ascent of Borah’s North Face. Below you will find one of the few photos they took during the 16.5 hours they climbed and photocopies of 2 Idaho Statesman articles published at the time. Below you will find reminiscences of the climb from Bob Boyles and 3 Idaho Statesman articles which covered the climb.
Bob Boyles offered these details:
We climbed the North Face on January 8-9, 1977. The only reason we even considered doing the face in Winter was the drought of 1976-1977. The Winter started out very cold and dry, and it had only snowed a couple of times before we went. So we rolled the dice and hoped the face wouldn’t be loaded up and, luckily, it wasn’t. We got into waist-deep unconsolidated sugar snow on our descent, but it went all the way down to the rocks below and wouldn’t slide. It was weird because when you walked through it, it would push the snow 10-20 feet in front of you.
When asked about avalanche danger Bob pointed out that:
The North Face of Mount Borah has only been climbed two times in Winter to my knowledge and both were in 1977, two weeks apart. We did it first and another team from Ketchum (or maybe it was Idaho Falls) did it two weeks later after the cold spell passed. It never got cold again all that Winter.
What made the climb possible was the drought of 1976-77. During a normal Winter, the cirque would be a pretty risky place to climb. A couple of years after our Winter ascent, we went up in late September and, over a mile from the face, ran into the avalanche debris that carried Bruce Otto’s snow measuring equipment out of the cirque.
When we got over the cliff band and got a close look at the face, we could see that the whole thing had slabbed off leaving behind a 6-foot crown. The bivy site where we usually stayed was covered in maybe 30 feet of rubble. Realizing that more of the slab might come off, we hugged the left side of the moraine and did a different route far to the left of the face.
Curt and I did the North Face Direct the next year and the crown was still there presenting a short, vertical step that we had to climbed over. A few years later, another one came down the gully that crosses the main trail to Chicken-Out Ridge. Most people walk right through it without realizing what it is. That slide snapped 4-foot trees like toothpicks and ran at least a mile.
Bob pointed out the 1977 conditions were an extremely rare occurrence:
I fish for salmon and monitor the USGS Idaho streamflow site daily during the season. From USGS records, most of the all-time low streamflow rates for Idaho rivers were set in 1977. Those kind of conditions don’t happen very often and we knew it before we went for the North Face. We figured we’d get snowed out before we could get a climb in that Winter. If we had waited one more week the temperatures warmed (for the rest of the Winter) and we would have missed the arctic air mass that had set in. But…no one expected we’d see that kind of drought, and the face could have safely been climbed all Winter.
Bob also warns that “In a normal Winter,like we’re seeing this year, I would not go up on the face. One might be able to make it up the far left side of the cirque to gain the ridge, but that would bypass the entire face.”
Bob Boyles supplied this photo, the only photo his team took on their Winter ascent of the North Face in January 1977. Frank Florence Photo
The first article discussed the upcoming attempt.
Idaho Statesman Article
The second article covered was an announcement that the climbers had succeeded. My copy was not in good enough shape to photograph so it is transcribed here:
By TOM GROTE
The Idaho Statesman
Four Boiseans Saturday successfully reached the summit of Mt. Borah, Idaho’s tallest mountain, the father of one the climbers said.Lou Florence, president of Sawtooth Mountaineering, said his son Frank Florence, Bob Boyles, Art Troutner and Mike Weber completed the climb in the dark about 5:30AM [Editor’s note: The original article listed the climbers addresses.]
The climb was completed a day earlier than planned, Florence said, because the four did not have to ski part of the way to the mountain. “The wind had blown away the snow and they tookadvantage of the good weather,” he said.Three of the 4 weatheredin good condition. Boyles suffered frostbite on 3 fingers. “We won’t know how bad until we see them,” Florence said.
The climb to the top of the 12,622 foot summit was believed to be the first Winter ascent along Mt. Borah’s North Face. The climb began about 1:30AM Friday, Florence said his son told him during a telephone call from Arco after the climb. “They ran into a snowstorm a few hours after they started, but the weather then cleared,” he said.Two hours into the climb, the party ran into winds of 20-30 miles per hour, adding a significant chill to the 15-degree temperature, he said. All 4 climbers made the summit after. 28 straight hours of climbing, twice as long as expected.
The climbers did not stay long at the top and left no mementos, Florence said. “They were very elated when they reached the top,” he said, “but the bad weather forcedthem to a take another way down than they had planned.”The four ate snacks during the climb. They were driving toward Boise late Saturday and were expected back around midnight, he said.
The usual Winter route to the summit ridge is on the Southwest Face, Florence said. Although the climbers were taking the more difficult route, they did not have the worst conditions possible. Deeper snow and colder temperatures hamper climbers in February and March, but a January ascent still qualifies as a Winter climb, Florence said.All four are experienced climbers, but only Frank Florence had prior experience on Mount Borah. In January 1973, he reached the top but lost the tips of 3 toes to frostbite.Another group tried to climb themountain in July, but was forceddown by winds up to 55 miles per hour.
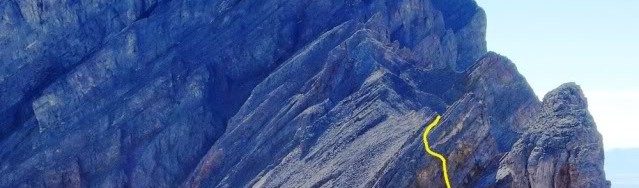
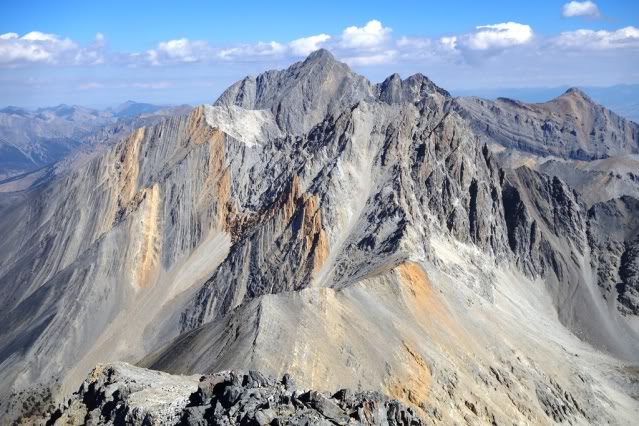
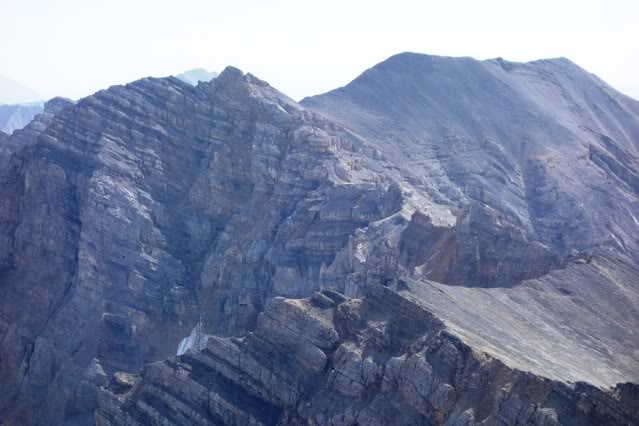
Below you will find Bob Boyles’ favorite photos from the first ascent of the Direct North Face of Borah (October 1976). The North Face of Mount Borah is considered by some to be one of the finest alpine climbs in Idaho and one of the few faces that holds ice during most years. The lower face starts at around 45 degrees and steepens to around 55 degrees below the summit pyramid. This route takes the left branch of the main couloir until it ends at the short steep rock step (Class 5.7) and then follows low Class 5, Class 4, and Class 3 steps directly to the summit. In the early season (late Spring and Summer), this route is usually a steep snow climb. In late season (late Summer and early Fall), this route can be all hard alpine ice (10 pitches, WI3). In good conditions, this route can be climbed in a few hours. In poor conditions, this route can take all day. The Southwest (Chicken-Out) Ridge is often used for descent.
Mount Borah’s North Face Direct Route. Bob Boyles PhotoMike Weber “frenching up” on hard ice.Bob Boyles high on the North Face.Mike Weber at the start of the main couloir.Mike Weber on belay below the crux pitch.Bob Boyles topping out on the North Face Direct Route.Mike on the summit of Mount Borah.Bob on the summit of Mount Borah.
Editor’s Note: The following report by Wes Collins documents his remarkable Lost River Range traverse. His effort no doubt included a number of first ascents. His achievement is one for the ages. All the photos are by Wes.
Last Winter, I traded several emails with Bob Boyles and Frank Florence who both planned on making the trip with me. We decided to hammer it out in a leisurely 4-day trip in late Spring while we could still melt snow for water. However, life kept interfering with our 3 different schedules while Spring came and went as did the snow and the end of our plans. Reluctantly, we decided to put it off for another year but when September rolled around, I made a snap decision to drop everything and solo the traverse. Prior to this time, I had stashed water along the route and only had to iron things out with my own schedule. On a Saturday (3 days later), I was on my way up Mount Borah after leaving a rig parked at the base of Lost River Mountain. The trailhead parking/camping lot was overflowing and there were cars parked on the road all the way past the outhouse. A few hundred yards up the trail I ran into 3 climbers from Idaho (Tracy, Nate and Nashina) and I chatted with them all the way up. The newly-finished trail makes the approach much nicer.
The first hiccup in the trip happened when we got to Chicken-Out saddle, I was climbing down the last little rock knob when my only Nalgene bottle popped out of my pack pocket and took a long, LONG tumble out of sight down the South Side of the col. I immediately thought I’m not going down there to look for that. I had a one liter disposable water bottle that I could make due and I was in a hurry to start the trip beyond Mount Borah.
I stashed my heavy pack on the South Side of Chicken-Out Saddle and, with the load off my back, I practically floated to the summit where a large crowd was lounging in the sun. My adopted crew must have felt bad for me sans pack and plied me with food and drink. Cody Feuz even chipped in. I only stayed on the summit for a few minutes. I always enjoy the company of other mountain people and knew I’d be solo for days but I was anxious to be on my way. Too anxious perhaps. Fifteen minutes after leaving the summit and nearly to the big saddle, I tripped over my own feet and face-planted in a rare patch of soft gravel. My only fall, thankfully.
When I got back to Chicken-Out Saddle, I hopped off the South Col without giving it a second thought. I knew I needed that damn Nalgene bottle but, more than that, I was not going to leave trash on the mountain. I found it WAY down the chute. It had tumbled at least 150 yards but was miraculously intact. I made it back to my pack just in time to see Tracy, Nate and Nashina cruise over Chicken-Out Saddle on their way down.
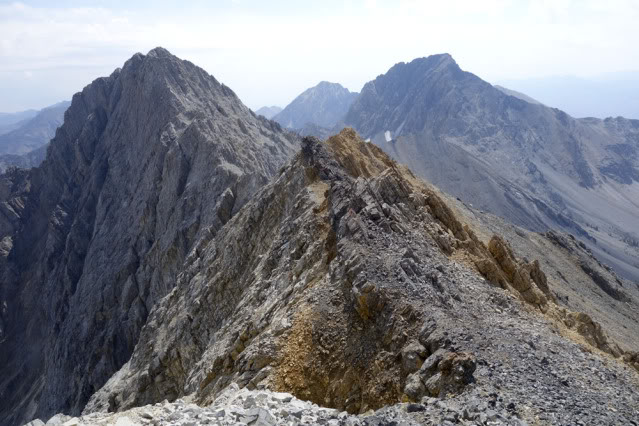
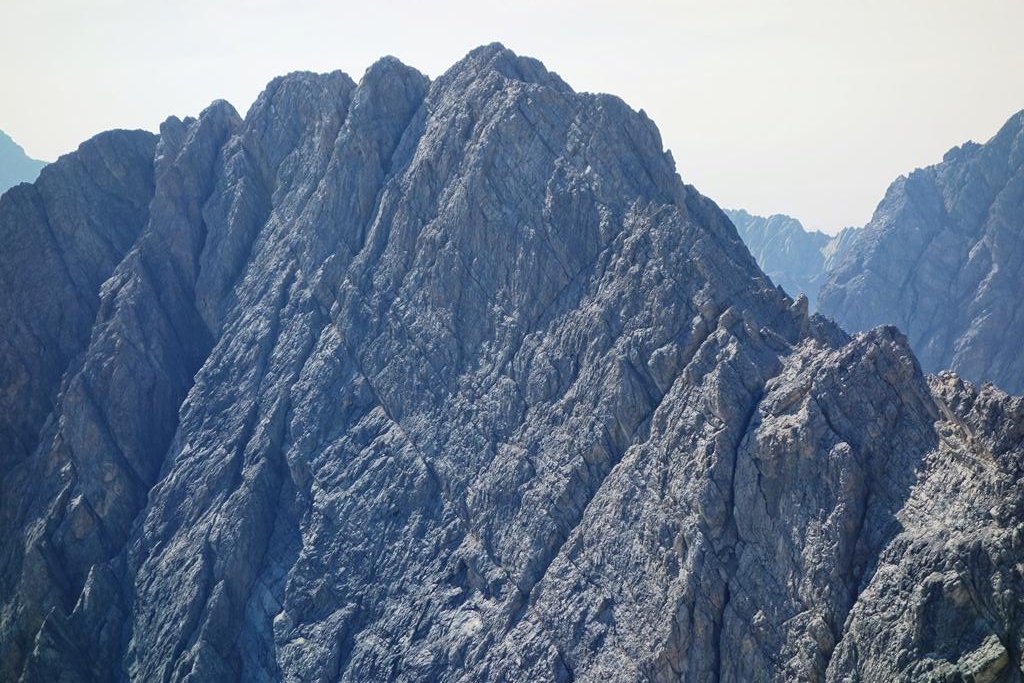
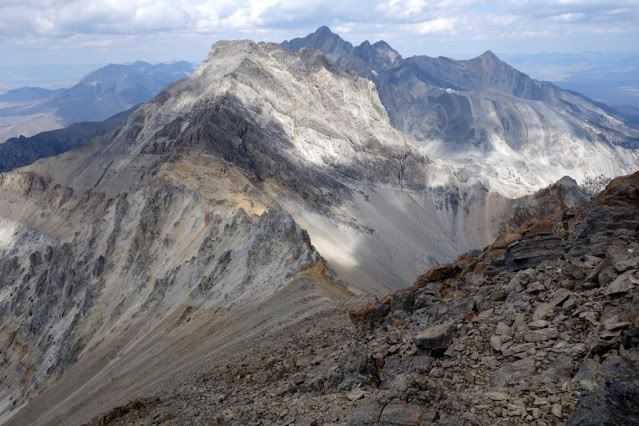
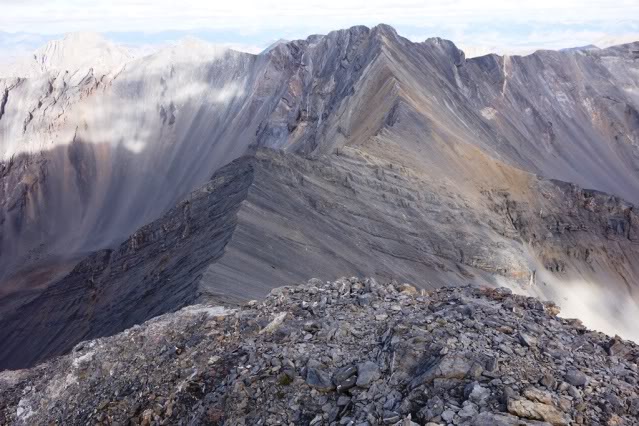
The ridge to Sacajawea from near Chicken-Out Saddle. Mount Idaho is on the right and White Cap Peak is in the middle.
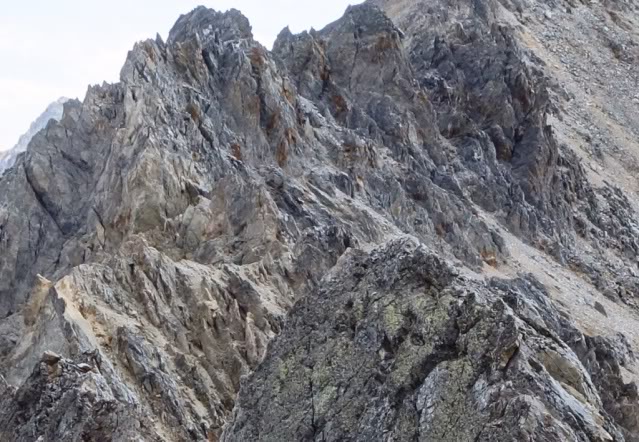
The trip over to Sacajawea was uneventful but fun. There are a few alternatives to get to the top but they all involve Class 4 scrambling. My favorite is to stick to the ridge. The rock quality is great and the exposure is awesome.
A closer look at the Class 4 sections of the ridge.
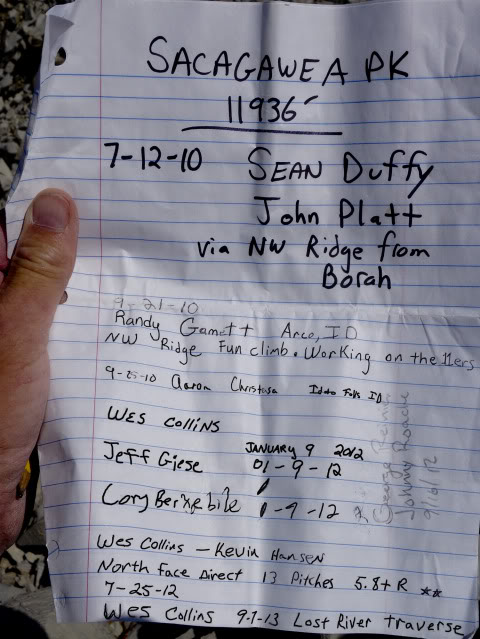
This was one of the few registers I opened in 4 days. I shouldn’t be mystified by this summit’s lack of visitors even though its right next-door to Mount Borah. There are other mountains to climb. Bigger mountains in different states. I should be more mystified by my own lack of imagination. What can I say. This range has an addictive nature and it still seems vast to me.
Sacajawea Register
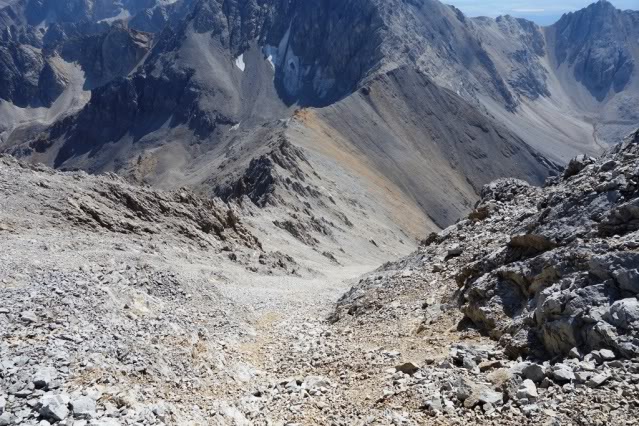
This descent to the Mount Idaho saddle looks like a straightforward scree-ski but sections of slab rock lie just under the surface, making this a slow and dreary slog. I had been down this side twice before and both times had been lured to the more stable-looking rocks on the ridge, but they are quite rotten and even slower going. This time, I just put my head down and followed the chute.
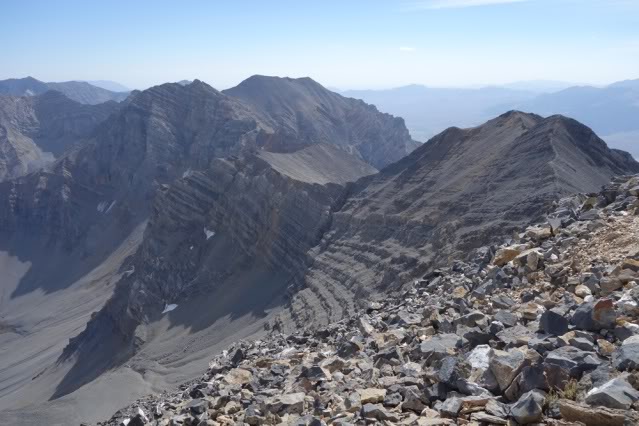
The descent off the South Side of Sacajawea.The descent route goes all the way down to the level of the big saddle and then crosses over. This chute is begging for a ski descent, probably a first ski descent from the mountain. Spring is coming!
I visited Merriam Lake several times in May through July and, on one of those trips, I stashed 3 gallons of water collected from snow melt just above the upper lake and then packed them up to the ridge. With plenty of water and a great view, camp below Mount Idaho was pretty comfortable.
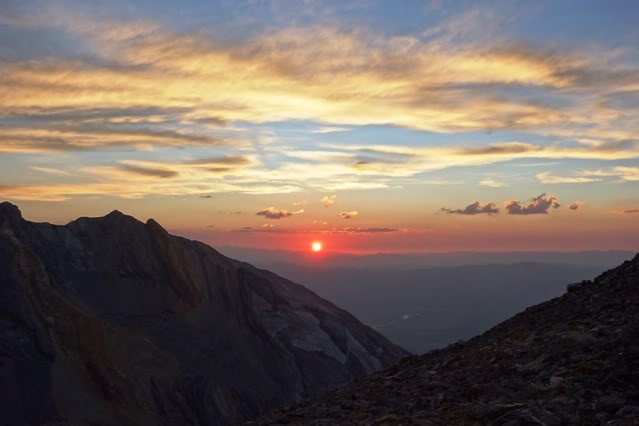
Camp below Mount Idaho. Sun setting off the North Shoulder at 11,308 feet.
In the morning, I stayed in my sleeping bag until the sun warmed things up a bit and then headed up the ridge toward the summit of Mount Idaho. Several years ago, my first trip to the top of this mountain was up the North Face and I climbed/rappelled down the North Ridge so I knew what to expect. To avoid those steep sections, I climbed out onto the Northwest Side. There are several sections of Class 4 climbing and some Class 5 but the rock was pretty nice. With good route finding, most of that steeper stuff could be avoided especially if you stayed closer to a broken gully system near the North Ridge.
The North Ridge of Mount Idaho as viewed from camp.Looking back to Mount Borah from the summit of Mount Idaho.
The ridge from Idaho to the summit Peak 11967 was all new ground to me. I’d looked at it several times in the past and, although there are a few jagged sections, it looked passable. I tried to stay close to the ridgeline and mounted several Class 4-5 sections, but all of that could be traded for Class 3 on the West Side of the crest.
Looking at the North Summit of Peak 11967 from the saddle below Mount Idaho.Some of the nasty ridgeline to Peak 11967.More ridge pinnacles with Mount Idaho in the background.Looking back to Mount Idaho and Mount Borah from the North Summit of Peak 11967.White Cap Peak as viewed from the North Summit of Peak 11967.
I burned up a good part of the day in the pinnacles and didn’t cross the South Summit of Peak 11967 until about 2:00PM. To save time, I avoided the worst parts of the ridge to White Cap Peak by staying on the West Side.
Looking back at the South Summit of Peak 11967 from the saddle below White Cap Peak.
Some of the ridge sections were unavoidable without a down-climb out onto the West Side. The East Side of the crest was generally too steep throughout this trip. There were a few mandatory Class 4 sections but I was able to avoid anything steeper.
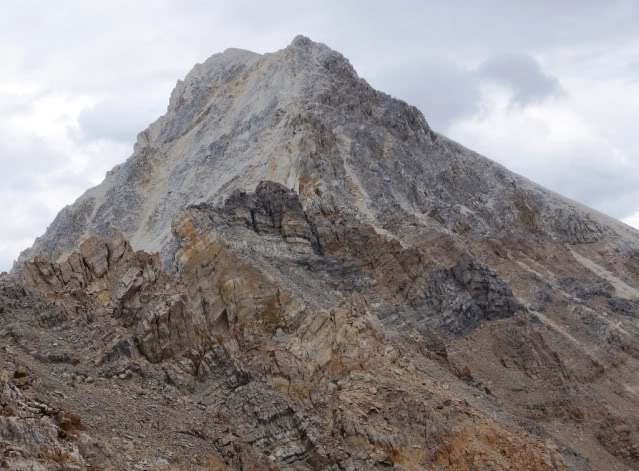
Looking toward the summit of White Cap Peak.From the top of White Cap Peak looking back at the South and North Summits of Peak 11967.White Cap Peak to Leatherman Peak.
I filled 3 gallons of water earlier from a spring above the Elkhorn trailhead and stashed them at Leatherman Pass. I put a few drops of bleach in two of the jugs and planned on using the other jug for cooking and coffee. The unpurified jug had a different lid so I wasn’t worried about accidentally drinking out of it. By the time I got to the summit of White Cap Peak, I was dehydrated. I hustled down to the stash and immediately took a good long pull off the first jug I came to. I only realized my mistake after I’d drunk at least a quart of the unpurified spring water. I wasn’t too worried though. It smelled OK and tasted fine.
I cooked a double-sized Mountain House meal and decided that I had time to get over the top of Leatherman Peak and into the saddle below Bad Rock Peak. By the time I hit the summit, I was feeling a little off my game. I told myself that it was just altitude combined with letting myself get a little dehydrated, but I was thinking I may have screwed up. Two years earlier, I’d seen mountain sheep drinking from the origins of that spring a few hundred yards above my collection point. There wasn’t anything I could do about it. If I got sick, I’d have to go down no matter which side of the peak I was on.
It was getting late and having been down the South Side of Leatherman Peak twice before, I knew the next several hundred yards would be tricky and slow. The trick is to avoid getting cliffed out and having to climb back up for a re-do. Usually this involves ignoring the obvious somewhat easier path half way down and sticking to a few rotten Class 4 cliff bands to your left. In my case, I used a rope and made 2 key rappels on the ridge proper.
Looking back at Leatherman Peak from the Bad Rock Peak saddle. Yellow (hikers route), red (my route), green (rappels).
Bad Rock camp was pretty comfortable and, like the first night, there was very little wind. I found a nice wide sheep bed to sleep on. In the morning, I woke up to a heavy layer of frost on my bag but it was another bluebird day. My stomach was still off but I definitely had not caught a bug like giardia. I forced a couple granola bars down and headed off, knowing this would be the toughest stretch.
Bad Rock Peak as viewed from the Leatherman Saddle. I have climbed this ridge twice and I knew that although it looks tough, its only Class 3. I made quick work of it.
I looked for a register on the summit of Bad Rock Peak but it’s gone missing. I have descended the South Face several years earlier and its every bit as difficult as the descent on Leatherman Peak. The same rule applies: stay on the ridge or face a long climb back up to the crest. I sat on the summit looking at the ridge beyond for a long time. I knew that it had been done in the past and that put me at ease. I REALLY wanted the summit of Mount Church from the ridge. I’ve heard rumors of it being climbed and was eager to follow.
Thirteen years ago, I traversed from Leatherman Peak to Mount Church by dropping off Bad Rock Peak and climbing Mount Church via its North Face which is an easier/faster alternative. On that trip, I studied the ridge to the summit and decided that it was impossible. However, when I got to the summit I read in the register that a solo mountaineer a few weeks ahead of me had done just that. I was bitterly disappointed in not giving it a chance and vowed to return and finish it.
Mount Church as viewed from Bad Rock Peak and the second half of the ridge. The long, jagged slab sections and two rotten-looking towers make this the most wild part of the traverse.The first half of the ridge.
I cliffed out twice while trying to get to the start of the ridge and both times involved a pretty long climb back up to start over. Once on the ridge, the big slab towers I was worried about along the first two-thirds of the traverse proved nothing more than easy Class 3 and I made good time by traversing on their Northeast slabs. The last two (and biggest) were much worse. I skipped the first one by cutting around its Northeast Side but the last one would have none of that and it turned out to be the sketchiest bit of the whole trip.
I planned on climbing right into the col between the towers but the closer I got, the more I realized it was a dead end. From the col, the ridge was blocked by a steep 80-foot buttress. To top it off, the rock quality was terrible. Instead of going all the way to the col, I managed to make my way up a line of weakness just below the crest. But there was a sequence of easy, but exposed, Class 5 steps and holds that could have (should have) blown out. By the time I got back to easier ground, I was pretty rattled. An easier solution would have been to traverse 30 feet lower and past the buttress.
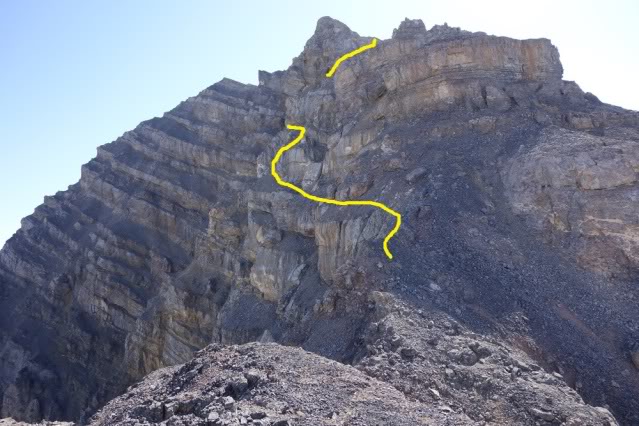
My route up Rotten Tower #2. The possible lower traverse is partly shown at the bottom of the photo.
Back on the ridge, I continued right up to the face and found a place to choke down a handful of cookies. I studied possible lines but was absolutely unable to find anything suitable to start up. I knew if I could make it past the first cliff band, I’d have a good shot at the upper mountain. But that first 30-40 feet of rotten nastiness over a fatal fall zone really needed a belay. I worked my way back and forth across the ridge, hoping to find the key but it just did not materialize.
On one foray, I continued well out onto the West Side of the crest thinking there might be something, but finally admitted defeat. I may have been too demoralized by clawing my way up the rotten tower and felt I’d pushed my luck far enough for this trip. But as I write this, I still believe I made the right choice. At any rate, it was a huge letdown. I traversed the entire West Face looking for a break in the cliffs but, for the most part, they just got bigger and steeper. This long side hill took an enormous amount of time and, in the end, I was close enough to the Church/Donaldson tarn (located on the standard route at 8,600 feet) that I dropped down and tanked up at the greenish pond.
I finished off the water in my trusty Nalgene bottle and filled it along with the gallon jug I had stashed in my pack with boiled water. It was then that I found a split in the bottom of the now-useless jug and realized things were going to get tougher. I climbed back to the crest, dumped everything but the stove, Nalgene bottle and cooker out of my pack and cruised to the top of Mount Church. Earlier, while on top of Bad Rock Peak, I spotted a small snow patch near the summit of Mount Church and I was able to refill again there. I made it to the summit of Donaldson Peak in mid-afternoon.
Donaldson Peak to Mount Church.
Although I intended to make another water cache in the saddle between Donaldson Peak and No Regret Peak, I got lazy and never made it happen. I was still on familiar ground and made quick work out of the long ridge to the summit of No Regret Peak. There are several small sections of Class 3 surprises along this segment and, luckily, I remembered to traverse around the one 70-foot drop-off at the start of the final climb up to the top. If you miss this, it’s a substantial down-climb to get back around it.
Donaldson Peak to No Regret Peak. Class 3 and rotten.
From the top of No Regret Peak to the base of Mount Breitenbach, I was on my second and final stretch of unfamiliar ground. I planned on camping on the ridge just below the big 200-foot tower that blocks access to the top from the ridge. I did not make it far before I came to the first mandatory rappel. It was an easy 40-footer but I had to leave a nut and loop of 6MM cord behind. I pulled my rope and continued to the second and (what I thought) last rappel.
It was too long to do as a double-rope rappel, so I wound up leaving my rope as well as a large nut and small cam attached to the anchor. I knew this meant a return trip in the near future to collect gear, but it would have meant a long down-and-up climb to bypass the drop. I continued on and, as luck would have it, bumped into another straight 30-foot drop. I had to do the long back-and-forth after all. In fact, there were several tough spots on the way to Mount Breitenbach and it eventually ate up the rest of the afternoon.
No Regret Peak as viewed from the ridge to Mount Breitenbach.
With less than 200 yards to go, I ran into yet another 50-foot impassable drop. Again, the only way past it would require a long descent and return. I really wanted to sleep on the crest but there was not a suitable place in sight. I shot one last photo of Peak 11280 and headed down. What the hell, I needed water and I knew Jones Creek started pretty high up.
Triple Peak as viewed from the last drop to Mount Breitenbach. Beyond is Bell Mountain and a section of the Lemhi Range.
The descent went pretty slow because I was still looking for a short way around the drop and back to the crest. By the time I hit the first springs, it was pretty dark. I was sick from not drinking enough water and worse from drinking Leatherman water. I stuck my head in the creek and took a good long pull, then filled and drank a Nalgene bottle. To hell with boiling it. I continued downward, looking for a place to bivy and noticed my headlamp needed new batteries.
I pulled my spares out and found they were dead. I returned the dying ones and made the best of them, but it was not long until I was blindly stumbling around in the boulders. Just about the time I was admitting to myself I’d be doing a dreaded sitting-bivy, I found a flat rock on the lip of a 10-foot waterfall and, after moving a few rocks, I had a nice little nest. For dinner, I ate a handful of cookies as my stomach could not do another freeze-dried feast.
Sleeping that close to the creek was music to my dehydrated ears and, despite the rough bivy spot, I slept very well. I had descended a long way down from the crest and, while drifting off to sleep, I started entertaining the thought of bailing out for the truck at first light. My headlamp was dead, my water container was inadequate, and I was feeling pretty ill.
Jones Creek Camp.
In the morning, I laughed at the idea of bailing. I had a good night’s sleep and a handful of almonds with my coffee improved my disposition even more. I hung around camp for a good 3 hours, drinking water and reading the book I brought. Eventually I gathered up my gear (including the useless water jug) and was standing on top of Mount Breitenbach in just over 2 hours.
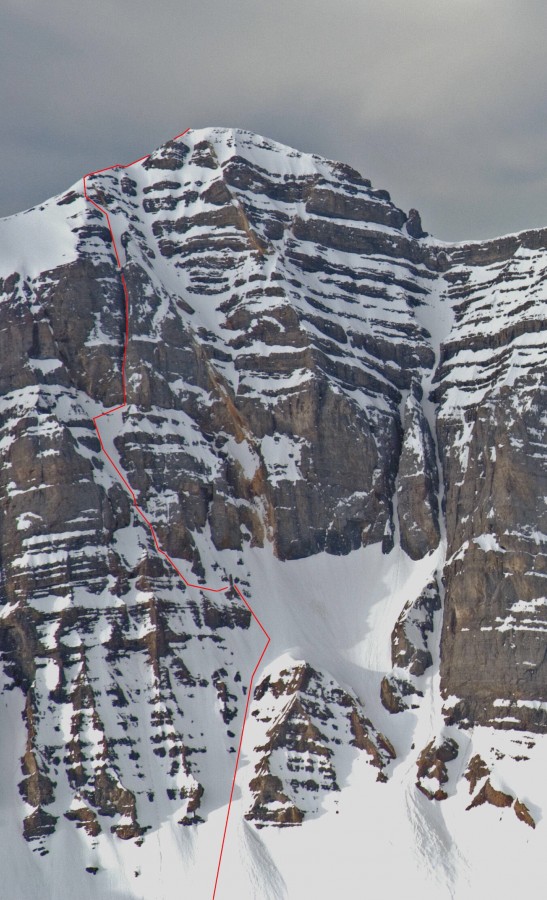
No Regret Peak as viewed from below the summit of Mount Breitenbach. The cliff bands made this part of the traverse pretty disheartening and, if I had to do it again, I’d drop 600 feet off the West Side of the summit and do the long side-hill traverse all the way over to Mount Breitenbach. The hike around this cliff on the way to the top (A). The first rappel (B). The second rappel (C). The first hike down and back up (D). The Second down and up (E). The last impassable cliff (F).
In my hurry the night before, I forgot to take a photo of Mount Breitenbach from the last cliff but I’d been between the summit and the last cliff several years earlier. There is a 200-foot steep buttress that is bypassed on its West Side by a short but exposed Class 4 wiggle.
The home stretch, Mount Breitenbach to Lost River Mountain.
I was on familiar ground once again. This section is easily the longest stretch of ridge between peaks and, although a good portion of it is easy hiking, there are several sections of Class 3- 4 rottenness. A broken sheep trail covers much of the distance on the West Side of the crest, making things even easier.
The last quarter of the ridge to Lost River Mountain.
The meat of this segment starts just before the final slopes to the summit and staying on or near the ridge can be perplexing. I’d describe it as climbing layer cakes of crap by finding the way up short cliffs and then searching for a way back down on the other side. There are a few places one has to leave the ridge (usually to the West Slopes) and climb around towers and obstacles but its all Class 3-4 unless you want to make it harder. On a previous trip, I’d bypassed this crux by climbing out to the right of the cliffs. This time I decided to explore to the left. It was all pretty rotten but fairly straightforward excluding one 15-foot section of rotten Class 5 over a steep scree-covered ledge. Beyond this tower, its Class 2 all the way to the truck.
The crux section.Looking back at Mount Breitenbach from just below the summit of Lost River Mountain. Mount Borah is visible in the upper left in the distance.
I was in fairly poor shape at this point. My water was long gone and all I was able to eat was the little pack of almonds. I sat on top and forced down some gorp for the descent while thinking about my return to things less significant than watching every step. I wondered how many miles I had covered and then decided it didn’t really matter. The miles covered up there are like dog years–1 seems like 7. A week later, I was back on top of No Regret Peak to retrieve my rope and gear. Three weeks after that, I collected my empty water jugs at Leatherman Pass as well as a golf club I brought down from the top of White Cap Peak. The water bottles below Mount Idaho will have to wait until Spring, I guess.
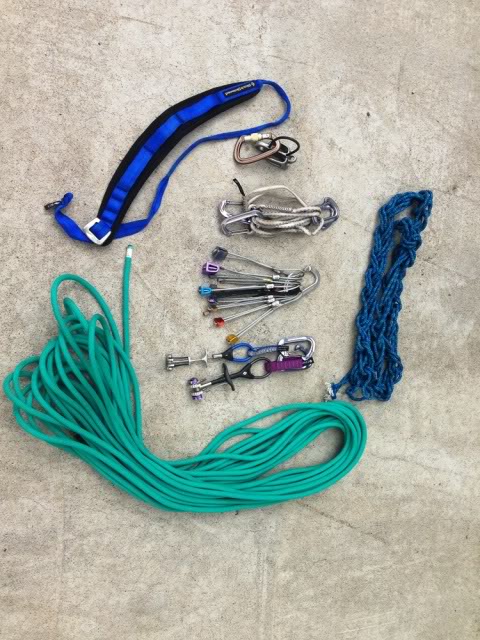
My gear
This was the kit I took and I only used it for rappels. The only place I’d have used it as a self-belay was at the base of Mount Church but I’d have had to set the base anchor pretty far from the climbing. The rope is a 9.1MM I’ve had for years and never used. I cut it in half to save weight. I used the blue gear sling as a swami belt and cut up pieces of the 6MM line for rap anchors.
Author’s Note. This is part trip report and part guide. I’ve left out a good many details in the hopes of preserving some of its mystique but I included reduced size photos of the entire ridge system. Get a hold of me if you want to see a larger version of any of them. (20MB)
Many of us have talked and schemed about doing this traverse and although there’s a lot of information out there, it mostly deals with individual sections. I know some have finished it and many have finished sections of it. If it’s on your wish list, I can tell you that it’s well worth the time and effort.
First Ascent: Bob Boyles, Mike Weber and Curtis Olsen
Rating: Grade III, 5.8, A2
Description
Provided by Curtis Olson, Mountain Guides Inc., Boise, Idaho (as published in the American Alpine Journal, Idaho, 1983)
Mount Breitenbach, North Face, Lost River Range
From July 13 to 16, Bob Boyles, Mike Weber and I made the first ascent of the North Face of Mount Breitenbach. Bill March had told me that some years ago his party was turned back by very severe rock climbing at the top of a large couloir. We easily identified the couloir and rock band.
We also discovered a possible route to the west of that couloir but still east of the summit. We pieced our climb together. It consisted of small, steep snowfields intermixed with steep limestone. The crux was a short aid pitch next to a waterfall which led us into a 900-foot long, 10-15 foot-wide hairline couloir that we followed to a bivouac on the skyline just east of the summit. In the dawn, we descended the East-Northeast Ridge in 2 hours of Class 4 climbing.
On the second ascent of this route, Duane Monte and Kevin Sweigert bypassed the aid on the overhanging waterfall (A2) by using a free variation to the east (Class 5.8).
Photo Essay by Bob Boyles
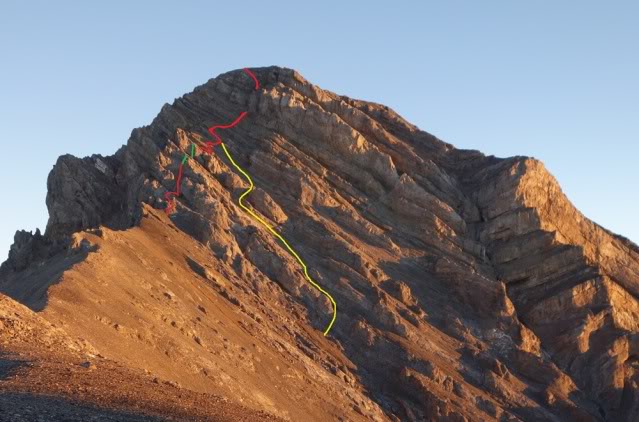
The North Face of Mount Breitenbach showing the Grand Chockstone Route. Wes Collins Photo
The Grand Chockstone Route on the North Face of Mount Breitenbach is shown above in red. There is a freestanding limestone stack about one-third of the way up the route where the route bends 90 degrees.
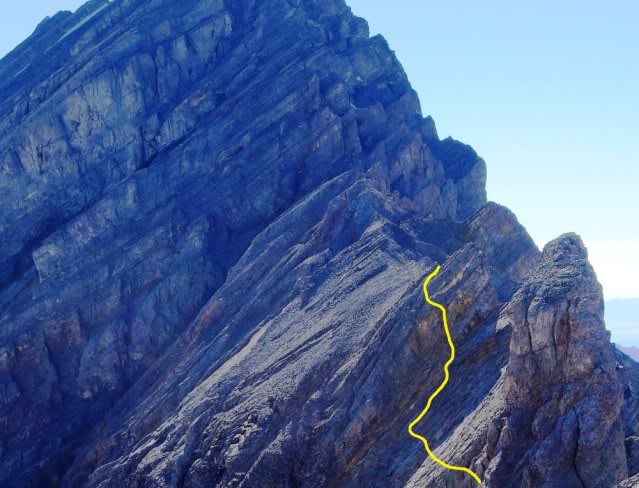
The stack. Curt Olson Photo
Amazingly, this stack appears to have survived the 1983 Borah Peak earthquake (magnitude 6.9) totally intact. This location is where the technical climbing begins.
Mike on the rock band pitch. Curt Olson Photo
This photo shows Mike on the rock band pitch between 2 hanging snow fields. All 3 of us rated this pitch as a dicey Class 5.8. And from this point on, retreat is not a very good option.
Mike topping out. Curt Olson Photo
Here, Mike is topping out at a marginal belay spot. Curt had 7 pieces of protection that consisted of copperheads and #1 and #2 stoppers strung together with equal tension slings on this belay. I clipped in and didn’t look at the anchors again until Mike finished this pitch. Faith be with us….
Mike on the traverse. Curt Olson Photo
This photo shows Mike traversing one of the hanging snowfields to the waterfall pitch.
Editor’s Note: Carl Hamke and Judi Steciak recently became the third and fourth climbers to summit all of Idaho’s peaks exceeding 11,000 feet. George Reinier and Johnny Roache were the first climbers to summit all of these peaks, while Judi is the first woman to accomplish this exceedingly difficult task. The short article below summarizes their quest and lists the 11,000-foot peaks that are not set forth in the book. The peaks identified below and the routes climbed by Judi and Carl were added to this site courtesy of Carl and Judi. Enjoy!
Tom Lopez’s guidebook for exploring Idaho mountains hits a good balance between detailed directions to trailheads and route descriptions that allow you to enjoy the thrill of discovery. Although many hundreds of mountains are included, peakbaggers wanting to summit Idaho’s highest mountains might be interested in learning more about the 17 ranked summits between 11,000-11,999 feet that are missing from the 2nd edition, plus a few easier routes on the Eleveners that are in the book.
It only fair to give a hint of the effort involved in summitting all 114 Eleveners. The peaks are spread out over 4 counties (Beaverhead, Blaine, Custer and Lemhi) and 7 different mountain ranges [Lost River (41), Pioneer (30), Boulder (17), Lemhi (9), White Cloud (8), White Knob (5) and Beaverhead (4)]. Most of the peaks are hikes or scrambles, but 10 have Class 4 routes and one has no other option than a Class 5 route.
In the process of reaching all those summits, we accumulated approximately 374,000 feet of elevation gain. This includes the 11,000 vertical feet we gained in one 2-day weekend (we were younger then). Note that the route from the Khumba base camp to the summit of Mount Everest shares the same elevation gain, albeit with higher starting and ending elevations. We covered at least 820 miles on the ground and spent at least 800 hours walking. You do the arithmetic: that’s only about a 1 mile/hour average. We found 23 peaks and/or routes for which we had no hard-copy information.
It took us 16 years from start to finish (along with many other higher and lower summits as well as ski trips, white water rafting…). We climbed as many as 3 Eleveners in one day. We needed 3 tries to summit some of the peaks, due to thunderstorms, wildfire smoke and not having the right gear in one case. We had to climb one Twelver twice in one day to reach an Elevener. We found no peaks with maintained trails to their summits. Trailheads were lonely places. We never met anyone on a summit and rarely met anyone in the valleys. We became addicted to the joy of exploration and discovery, and enchanted by the solitude, wildlife, wildflowers, pristine wilderness, and achingly beautiful vistas. Beware!
They say that one person’s junk is another’s treasure. Archeologists of future millennia should have a field day sifting through the midden of our modern society. Humans seem to leave calling cards wherever they go. Here are some Idaho mountain summit artifacts left by those of two or three generations back.
Left to Right (pictured):
WHISKEY PEAK (11,154 feet, Boulder Mountains). This pre-Prohibition whiskey bottle was left by some reveler high on this mountain. The summit view is north to Castle Peak (September 1993).
LEATHERMAN PEAK (12,228 feet, Lost River Range). The coffee can worked well to house a summit register until it rusted out. This one may have been placed by William McIntyre of Twin Falls in the mid 1950s….and look at that wooden ice axe! View north to Borah Peak (September 1984).
HOODOO PEAK/WCP-3 (10,588 feet, White Cloud Peaks). This summit sardine can dates from the early 1960s (October 2004).
Since the beer can’s introduction in 1935, mountains have provided an
artistic theme. The draw seemed to be recreation and pure water. Here
are some brands from the 1930s to the 1950s featuring Western U.S.
mountains.
Cone tops (shown on the top row) are sought-after items by collectors. Bohemian Club, brewed in Boise, was a favorite of WWII era beer drinkers. Tons of these could once be found in the Mount McCaleb dump (Mackay). The Sun Valley can (brewed in Pocatello) is rare. But keep exploring. You never know what’s over the next hill.
All material courtesy of Rick Baugher (April 23, 2007).